About Me

Monday, 31 October 2011

DATAGUARD CONFIGURATION


Suppose we have two servers dba1 and dba2.On the first server dba1 we have production databas
and on the second server we want to create stand by database .In order to configure dataguard follow
the given steps. 

1.create a cross network between two servers production
and standby


( PRODUCTION SIDE )

  ]$ vi listener.ora

  prod =
  (DESCRIPTION_LIST =
    (DESCRIPTION =
      (ADDRESS_LIST =
        (ADDRESS = (PROTOCOL = TCP)(HOST = dba1)(PORT = 3456))
      )
    )
  )

SID_LIST_prod =
  (SID_LIST =
    (SID_DESC =
      (SID_NAME = dharam)
      (ORACLE_HOME = /oraeng/app/oracle/product/11.2.0)
    )
  )

After configure listener start the listener

  ]$ lsnrctl start prod


( STANDBY SIDE )

  ]$ vi tnsnames.ora

  to_prod =
  (DESCRIPTION =
    (ADDRESS_LIST =
      (ADDRESS = (PROTOCOL = TCP)(HOST=dba1)(PORT=3456))
    )
    (CONNECT_DATA =
      (SID = dharam)
    )
  )

  ]$ tnsping to_prod

  ]$ vi listener.ora
 
  stand =
  (DESCRIPTION_LIST =
    (DESCRIPTION =
      (ADDRESS_LIST =
        (ADDRESS = (PROTOCOL = TCP)(HOST = dba2)(PORT = 4567))
      )
    )
  )

SID_LIST_stand =
  (SID_LIST =
    (SID_DESC =
      (SID_NAME = dharam)
      (ORACLE_HOME = /oraeng/app/oracle/product/11.2.0)
    )
  )

   ]$ lsnrctl start stand


( PRODUCTION SIDE )

   ]$ vi tnsnames.ora

   to_stand =
  (DESCRIPTION =
    (ADDRESS_LIST =
      (ADDRESS = (PROTOCOL = TCP)(HOST=dba2)(PORT=4567))
    )
    (CONNECT_DATA =
      (SID = dharam)
    )
  )

   ]$ tnsping to_stand

2.Create a separate directory at production

]$ mkdir  /disk1/oradata/dharam/dg

]$ cp   *.dbf   *.log   /disk1/oradata/dharam/dg
 
  dbs]$ orapwd file=orapw$ORACLE_SID  password=sys  force=y

]$ cp orapw$ORACLE_SID   /disk1/oradata/dharam/dg

3.In pfile at production add these parameters 
   ]$ vi $ORACLE_HOME/dbs/init$ORACLE_SID.ora

log_archive_dest_1='location= /disk1/oradata/dharam/arch'
log_archive_dest_2='service= to_stand lgwr sync affirm    reopen=5’
standby_archive_dest= /disk1/oradata/dharam/arch
standby_file_management = auto

]$ cp init$ORACLE_SID.ora /disk1/oradata/dharam/dg

 ]$ sqlplus / as sysdba


4.now we will create stand by controlfile.

sys> startup mount

sys> alter database create standby controlfile as
          ‘/disk1/oradata/dharam/dg/stand.ctl’;


5.Bring all the CRD files from production to stand by server 

STANDBY SIDE

]$ export ORACLE_SID=dharam

 
]$ mkdir /disk1/oradata/dharam

we need to bring all the files from production server to stand by server either through ftp or any other way . Then copy parameterfile and password file to dbs location of standby database .

]$ cp init$ORACLE_SID.ora orapw$ORACLE_SID  $ORACLE_HOME/dbs

Open the pfile and give controlfile name as stand.ctl and service=to_prod 

6.Mounting stand by database

]$ sqlplus / as sysdba

sys > startup nomount
  
sys > alter database mount standby database;

 Keep standby database in MRM mode and take some log switches at production side.
  
sys>alter database recover managed standby database;

7.Now check the consistency of standby database

On production

sys>alter system switch logfile;

sys>archive log list;

On standby

sys>archive log list;

archive log sequence should be same.

sys > select name, applied from v$archived_log;

If all archive log files are applying, then configuration is fine.

Sunday, 30 October 2011

How to recover a datafile which is not backed up

Suppose a situation in which you loose a datafile for which you dont have prior backup.These are the steps how you can recover the datafile in this kind of situations....

Let me assume that i lost a datafile ts1.dbf from /disk1/oradata/dharam/ts1.dbf  location.


Please make sure that 

1.You are running your database in ARCHIVELOG mode and
2.You have all archive logs available.


SYS> startup
ORACLE instance started.

ORA-01157: cannot identify/lock data file 6 - see DBWR trace file
ORA-01110: data file 6: '/disk1/oradata/dharam/ts1.dbf'


SYS> alter database datafile 6 offline;

Database altered.

SYS> alter database open;

Database altered.

SYS> select * from v$recover_file;

FILE# ERROR TIME
---------- ----------------------------------- ---------
  6 FILE NOT FOUND

SQL> select file#,status from v$datafile;

FILE# STATUS
---------- -------
1 SYSTEM
2 ONLINE
3 ONLINE
4 ONLINE
5 ONLINE
6 RECOVER

6 rows selected.


SQL> alter database create datafile 6 '/disk1/oradata/dharam/ts1.dbf';

Database altered.
 
Recover your datafile 6 without backup

]$rman target /

RMAN> recover datafile 6;

Bring datafile online

SYS> alter database datafile 6 online;

Database altered.

SQL> select file#, status from v$datafile;

FILE# STATUS
---------- -------
1 SYSTEM
2 ONLINE
3 ONLINE
4 ONLINE
5 ONLINE
6 ONLINE


Tuesday, 25 October 2011

Oracle Managed Files : Database Creation


Follow these steps to create a simple OMF database

Oracle-managed files greatly simplifies the administration of an Oracle database. Oracle-managed files removes the need to directly manage the operating system files comprising an Oracle database. You specify operations in terms of database objects rather than filenames.

1. Export a SID for your OMF database 
]$export ORACLE_SID.=omf

2. Create parameter file and include the following parameters
 Included in the initialization parameter file:
db_name=omfdb
DB_CREATE_FILE_DEST = '/disk1/oradata/ omfdb'
DB_CREATE_ONLINE_LOG_DEST_1 = '/disk1/oradata/omfdb'
Note : all the datafiles ,logfiles and controlfiles will be created in /disk1/oradata/omfdb location.

 3. Make directory structure 
]$mkdir   -p /disk1/oradata/omfdb

4. Create Database Statement:
In nomount state of database issue below statement

SQL> CREATE DATABASE;

database created


Sunday, 23 October 2011

A BREIF INTRODUCTION TO STORAGE PARAMETERS

Every Tablespace has default storage parameters. To override the system defaults in that Tablespace, a user can specify the parameters while creating the objects. The following are the parameters:

INITIAL: The size in bytes of the first extent allocated when a segment is created. Though default system values are given data blocks, use bytes to set a value for this Parameter. You can also use the abbreviations K and M to indicate Kilobytes and Megabytes.

Default:5 datablocks
Minimum:2 datablocks
Maximum:Operating system specific

NEXT: The size of the next extent to be allocated for a segment. The second extent is equal to the original setting for next. From third extent onwards ‘Next’ is set to the previous size of Next multiplied by (1+Pctincrease/100). You can also use K and M for kilobytes and megabytes as above.

Default:5 datablocks
Minimum:1 datablock
Maximum:Operating system specific

MAXEXTENTS: The total number of extents, including the first, can ever be allocated for the segment.

Default:Dependent on the data block size and operating system
Minimum:1 (extent)
Maximum:Operating system specific

MINEXTENTS: The total number of extents to be allocated when the segment is created. This allows for a large allocation of space at creation time, even if contiguous space is not available.

Default:1 (extent)
Minimum:1 (extent)
Maximum:Operating system specific

If minextents are more than 1, then the specified number of incremental extents is allocated at creation time using initial, next, pctincrease.

PCTINCREASE: The percent by which each incremental extent grows over the last incremental extent allocated for a segment. If pctincrease is 0, then all incremental extents are the same size. If pctincrease is greater than 0, then each time the next is calculated, it grows by pctincrease. It cannot be negative. It is specified in percentage.

Default:50 (%)
Minimum:0 (%)
Maximum:Operating system specific

Note: Pctincrease for Rollback Segment is always 0. Pctincrease cannot be specified for Rollback Segments.

PCT FREE: It is used to set percentage of a block to be reserved (kept free) for future updates. After this parameter is met the block is considered to be full and it is not available to insert new rows.

PCTUSED: It is used to allow a block to be reconsidered for the insertion of new rows. When the percentage of a block being used falls below PCTUSED either through row deletion or updates reducing column storage, the block is again available for insertion of new rows.

INITTRANS: It reserves pre-allocated amount of space for initial number transaction entries to access rows in the data block concurrently. Space is reserved in the header of all data blocks of all associated data or index segment. The default value is 1 for tables and 2 for clusters.

MAXTRANS: As multiple transactions concurrently access the rows of the same data block, space is allocated for each transaction’s entry in the block
Once the space is reserved by the inittrans is depleted, space for additional transaction entries is allocated out of the free space in a block, if available. Once allocated, this space effectively becomes a permanent part of the block header. The maxtrans parameter is used to limit the no. of transaction entries that can concurrently use data in a data block.

Manual Oracle 11g r2 Database creation on Linux


Follow the following Steps for Manual Oracle 11g r2 Database creation on Linux :

  1. Set environment variable by editing ‘.bash_profile' file.
  2. Create parameter file in $ORACLE_HOME/dbs locatrion
  3. Create necessary directory structure.
  4. Create database creation script and run at SQL prompt.

After creation of the database build the data dictionary views,users,roles and plsql packages by
creating and runing script 'postdbcreate.sql' at SQL prompt.

Prerequisites for creating database:

Step 1: setting environment variable with '.bash_profile'

]$ vi .bash_profile
# User specific environment and startup programs
export PATH=$PATH:$HOME/bin
export ORACLE_SID=orcl
export ORACLE_HOME=/u1/app/oracle/product/11.1.0
export PATH=$ORACLE_HOME/bin:$PATH:.

Step 2: create parameter file (pfile)

[oracle11g@testdba dbs]$ cd /u1/app/oracle/product/11.1.0/dbs/
[oracle11g@testdba dbs]$ cp init.ora init$ORACLE_SID.ora
[oracle11g@testdba dbs]$ vi init$ORACLE_SID.ora
db_name=orcl
shared_pool_size = 100Mb
control_files =/disk1/oradata/orcldir/control.ctl
diagnostic_dest=/disk1/oradata/orcldir
undo_tablespace=undotbs
undo_management=auto
compatible = 11.2.0

Step 3: create directory structure

]$ mkdir /disk1/oradata/orcldir
  
Step 4: create database creation script and run at SQL prompt .

SYS>>startup nomount

SYS>>ed createdb

create database orcl
datafile '/disk1/oradata/orcldir/system.dbf' size 200m
sysaux datafile '/disk1/oradata/orcldir/sysaux.dbf' size 100m
undo tablespace undotbs
datafile '/disk1/oradata/orcldir/undotbs.dbf' size 50m
default tablespace userdata
datafile '/disk1/oradata/orcldir/userdata.dbf' size 100m
default temporary tablespace temp
tempfile '/disk1/oradata/orcldir/temp.dbf' size 60m
logfile
group 1('/disk1/oradata/orcldir/redo1a.log') size 4m,
group 2('/disk1/oradata/orcldir/redo2a.log') size 4m
controlfile reuse;

SYS>>@createdb

Database created.

Step 5: Postdbcreat.sql

SQL>ed postdbcreate.sql
@$ORACLE_HOME/rdbms/admin/catalog.sql
@$ORACLE_HOME/rdbms/admin/catproc.sql
conn system/manager
@$ORACLE_HOME/sqlplus/admin/pupbld.sql

SQL> @postdbcreate.sql

 After running postdbcreate script database creation is complete.


Saturday, 22 October 2011

ORACLE TABLE COMPRESSION

Oracle compress data by removing non unique values in a data-block. Any duplicate occurrence of a value in a block is replaced by a symbol entry in  “symbol table” in the data block.for example deptno=20 is repeated 7 times in a data block, it will be stored only once and rest 6 times a symbol entry will be stored in symbol table.

SQL>select bytes/1024/1024 "Size" from user_segments where segment_name='EMP';

Size
----------
18

SQL> alter table emp move compress;


Table altered.

SQL> select bytes/1024/1024 "Size" from user_segments
2 where segment_name='EMP';

Size
----------
6

since you have compressed the table and hence row id's of the rows are changed ,its recommended that you rebuild the indexes of the compressed tables.


Sunday, 16 October 2011

ORACLE WALLET AND TABLESPACE ENCRYPTION

We can create a tablespace in which the entire content will be stored in encrypted format.By default in unencrypted tablespace data is stored in ASCII format and we can see the contents of a tablespace by strings command .
]$strings userdata.dbf
It will show data in ascii format

To perform tablespace encryption we have to create a wallet in sqlnet.ora

WALLET: It has the password which can be called as key .whenever we open the database we will have to open the wallet with key.

when a user uses the encrypted tablespace the inserted data is automatically encrypted and when fetches data then the data is automatically decrypted .

Configure wallet

]$ cp $ORACLE_HOME/network/admin/samples/sqlnet.ora   ~
]$cd ~

~]$vi sqlnet.ora
Go to line 755 and edit from 755 to 759

ENCRYPTION_WALLET_LOCATION
=(SOURCE
=(METHOD=FILE)
(METHOD_DATA=(DIRECTORY=/disk1/oradata/dharam/wallet))
)
 
~]$mkdir /dik1/oradata/dharam/wallet
 
~]$export TNS_ADMIN=$HOME
 
SYS>alter system set encryption key authenticated by "mypwd"
 
CREATING ENCRYPTED TABLESPACE 
 
SYS>create tablespace enc1 datafile '/disk1/oradata/dharam/enc1.dbf' 
size 20m 
encryption using 'AES128'
default storage(encrypt);
 
dharam]$strings enc1.dbf
data in encrypted format
 
TO OPEN WALLET
 SYS>alter system set wallet open identified by "mypwd"; 
 
TO CLOSE WALLET
SYS>alter system set wallet close;

Sunday, 9 October 2011

Data guard broker overview and configuration

DATAGUARD BROKER


The Oracle Data Guard broker is a distributed management framework that automates and centralizes the creation, maintenance, and monitoring of Data Guard configurations.

          The following list describes some of the operations the broker automates and simplifies-

·         Creating Data Guard configurations that incorporate a primary database, a new or existing (physical, logical, or snapshot) standby database, redo transport services, and log apply service.
·         Adding additional new or existing (physical, snapshot, logical) standby databases to an existing Data Guard configuration, for a total of one primary database, and from 1 to 9 standby databases in the same configuration.
·         Managing an entire Data Guard configuration, including all databases, redo transport services, and log apply services, through a client connection to any database in the configuration.
·         Managing the protection mode for the broker configuration.
·         Invoking switchover or failover with a single command to initiate and control complex role changes across all databases in the configuration.
·         Configuring failover to occur automatically upon loss of the primary database, increasing availability without manual intervention.
·         Monitoring the status of the entire configuration, capturing diagnostic information, reporting statistics such as the redo apply rate and the redo generation rate, and detecting problems quickly with centralized monitoring, testing, and performance tools.

The broker supports one or more Data Guard configurations, each of which includes a profile for one primary database and for up to nine physical or logical, standby databases.
A supported broker configuration consists of following objects-

·         A configuration object, which is a named collection of database profiles. A database profile is a description of a database object including its current state, current status, and properties. The configuration object profiles one primary database and up to nine standby databases that can include a mix of both physical and logical standby databases. The databases of a given configuration are typically distributed across multiple host systems.
·         Database objects, corresponding to primary or standby databases. The broker uses a database object's profile to manage and control the state of a single database on a given system. The database object may be comprised of one or more instance objects if this is a RAC database.
·         Instance objects. The broker treats a database as a collection of one or more named instances. The broker automatically discovers the instances and associates them with their database.


         Configuration of broker
                                                                                                             
Production

Hostname=dba15
SID=newdb
Db_name=newdb
Db_unique_name=north


Standby
Hostname=dba21
SID=newdb
Db_name=newdb
Db_unique_name=south

Both production and standby databases are running with spfile
Listener at production is prod
Tnsnames at standby is to_prod
Listener at standby is standby
Tnsnames at production is to_stand


Pfile of production database

Undo_retention=3600
Undo_management=auto
Db_flashback_retention_target=4320
Db_recovery_file_dest_size=500m
Db_recovery_file_dest=/disk1/oradata/newdb/flash


Archive log mode and flashback is enabled on both the primary and standby

Create standby log files on both primary and standby databases

SYS> alter database add standby  logfile
        Group 3 ‘/disk1/oradata/newdb/std3.log’ size 4m,
        Group 4 ‘/disk1/oradata/newdb/std4.log’;


Create spfile from pfile;
( on both primary and standby databases)

SYS> Alter system set dg_broker_start=true;
 ( on both primary and standby databases)


Start the data guard broker commad line interface
At primary side
Dba15  ~]$ dgmgrl
DGMGRL> connect sys/sys
DGMGRL> create configuration wstdg as
               Primary database is north
               Connect identifier is to_prod;

Note : connect identifier is the tnsname through which the broker connects to the particular database.

DGMGRL> add database south as
Connect identifier is to_stand;

DGMGRL> SHOW CONFIGURATION;
DGMGRL> ENABLE CONFIGURATION;
DGMGRL> ENABLE DATABASE SOUTH;
DGMGRL> SHOW DATABASE SOUTH;
DGMGRL> SHOW CONFIGURATION;

Coverting a physical standby database to a snapshot standby database

DGMGRL > CONVERT DATABASE SOUTH TO SNAPSHOT STANDBY;

(Need to restart the standby database)

DGMGRL > CONVERT DATABASE SOUTH TO PHYSICAL STANDBY;


Enable the fast_start failover and start the observer

Set the FastStartFailoverTarget configuration property

DGMGRL> EDIT DATABASE  NORTH SET  PROPERTY
             FastStartFailoverTarget= SOUTH;

There is no need to set this property on the target standby as this is done automatically.


DATAGUARD OBSERVER :
Observer is a utility that is available with the dataguard. Its basic purpose is to keep the
database available to the clients all the time. It is started on a separate location other than
Primary and Standby locations. After starting the observer, it starts watching
continuously both the sites. Whenever the PRIMARY database fails due to any reason
and the connection between the PRIMARY site and the observer breaks, the observer
waits for a certain time which is set up during setting the broker configuration. When this
time passes, the observer automatically starts the failover process. As a result, the
Physical Standby database is converted to PRIMARY database. After this failover, the
users again connect to the database. This connection redirects them automatically to the
new PRIMARY database.

Take another server dba12 ( other than primary and standby) to start the observer
Configure tnsnames.ora file


Dba12 ~]$ dgmgrl
DGMGRL> connect sys/sys@to_prod
DGMGRL> START OBSERVER
Observer started

(we will not get the prompt after issuing the command)

The primary side
Dba15 ~]$ dgmgrl
DGMGRL> connect sys/sys
DGMGRL> ENABLE FAST_START FAILOVER;
DGMGRL> SHOW FAST_START FAILOVER;

Performing a switchover operation

Ensure that the state of the primary and standby databases are Transport-on and apply-on, respectively.

Check the primary database
DGMGRL> SHOW DATABASE VERBOSE NORTH;
Check the standby database
DGMGRL> SHOW DATABASE VERBOSE SOUTH;

Issue the switchover command to swap the roles of the primary and standby databases
DGMGRL> SWITCHOVER TO SOUTH;

(the broker automatically shuts down and restarts the old primary database as part of the switchover )
(switchover succeeded , new primary is SOUTH)
DGMGRL> SHOW CONFIGURATION;


Saturday, 8 October 2011

Excessive redolog generation during hot backups


Many of you must have heard or experienced that while taking hot backup ofdatabase LGWR process writes aggressively. Meaning that more redo data has beenwritten to redo log file and consecutively more archive logs gets generated.

Here is the common misconception we have in our mind. If some one ask, whyexcessive redo logs and archive logs are getting generated when we start a hotbackup of database ?? Quickly we answer .. Its simple, when we put tablespacein hot backup mode, Oracle will take a check point of tablespace and data filesbelonging to this tablespace will be freezed. Any user activity happening onobjects belonging to this tablespace wont write data to these datafiles,instead it will write data to redo log files. So obviously there will be moreredo log file generation.

Well, to some extent this is COMPLETELY WRONG !!!
I will straight way come to the point and explain you what happens when weput the tablespace in hot backup mode.
Your first assumption that datafiles belonging to the tablespace in hot backup mode is freezed is wrong. Datafiles are not freezed, only the datafileheaders will be freezed !! So simply imagine that when you put the tablespace in backup mode, Oracle will take a checkpoint and update the datafile headers with checkpoint SCN and there after it is freezed until we take tablespace out of backup mode.
Other datafile (other then header part) remains as normal and data changeshappens continuously to this datafile.

Now you may want to ask me “do I mean to say that datafiles gets updatedcontinuously even when we are coping the same to backup location ?”. The answeris YES. Never think that the datafile you are coping is “Consistent”. No,datafiles gets changed continuously !!!
You might want to ask couple of more questions then.

1) If we say that backup file is not consistent and changes continuously,then how come Oracle is able to recover the database when we restore thatdatafile?
2) If the data changes are anyway happening continuously on data files, thenwhy there is excess redo log generation ?

Thats it !! don’t ask me more then this. Let me explain answers to thesequestions.
Consider a typical case, where an Oracle database is installed on Linux platform. The standard Oracle block size if 8K and lets say that OS level data block size is 1K. Now when we put the tablespace in “Begin Backup” mode checkpoint has happened and datafile header is freezed. You found which are thefiles related to this tablespace and started copying using OS command. Now when you copy a datafile using OS command it is going to copy as per OS block size.Lets say when you start copying it gave 8 blocks to you to copy – that means you are copying 4K (1K X 4) to backup location. That means you are copying halfof Oracle block to backup location. Now this process of copy can be preempted by Server CPU depending on load. Lets say when you started copying after copy of those 8 block (4K, half of Oracle block), your process get preempted by CPU and it has allocated CPU time to some other important process. Mean while DBWRprocess changes that block that you have copied halfway (since datafile is not freezed and only header is freezed, continuous updates can happen to datafile).

After a while CPU returns back and gives you next 4 blocks to copy (rest ofthe half Oracle block). Now here is the problem !!! we copied half of theoracle block taken at time T0 and another half taken at time T1 and in-betweenthe data block got changed. Does this sounds consistent ? Not to me !! Such typeof block is called “Fractured Block”.

Well, since Oracle copies files like this it should do some thing, so thatduring recovery it wont face any problem.

Usually in case of a normal tablespace (which is not in begin backup mode),when a transaction happens oracle generates redo information and puts in redolog file. This is the bare minimum information that oracle generates in orderto redo the information. It does not copy the complete block. Where as in caseof begin backup mode, if a transaction happens and changes any block FOR THEFIST TIME, oracle copies the complete block to redo log file. This happens onlyduring first time. If subsequent transaction updates the same block again,oracle will not copy the complete block to redo, instead it will generateminimum information to redo the changes. Now because oracle has to copy thecomplete block when it changes for the first time in begin backup mode, we saythat excess redo gets generated when we put tablespace in begin backup mode.
Question arises, why Oracle has to copy the complete block to redo logfiles. As you have seen above that during copy of datafile, there can be many fractured blocks, and during restore and recovery its going to put those block back and try to recover. Now assume that block is fractured and oracle hasminimum information that it generates in the redo. Under such condition it wontbe possible for Oracle to recover such blocks. So instead Oracle just copiesthe entire block back from redo log files to datafiles during recovery process.This will make the datafile consistent. So recovery process is very importantwhich takes care of all fractured blocks and makes it possible to recover a database.
I hope this explains above 2 questions.

Now you can easily explain why hot backup is not possible if database is inNOARCHIVELOG mode.
When you take a backup using RMAN, it does not generate excessive redo logs.The reason is simple. RMAN is intelligent. It does not use OS block forcopying, instead it uses oracle blocks for copying datafiles so the files are consistent.

Thursday, 6 October 2011

OEM Grid Control Installation And Overview

Overview of Enterprise Manager Grid Control
Grid Control is a system management software that delivers centralized monitoring, administration, and life cycle management functionality for the complete Oracle IT infrastructure, including systems running Oracle and non-Oracle technologies. Your infrastructure may comprise multiple Oracle Databases, Oracle WebLogic Managed Servers, Web applications deployed on these servers, hosts running these targets, and so on. You can, of course, use the individual product consoles to monitor the status of each of these targets, but it becomes cumbersome to shuttle between multiple console windows and track the performance of each of these targets using so many windows.

Grid Control offers a single-window solution that allows you to monitor and manage the complete Oracle IT infrastructure from a single console. Grid Control also offers support for monitoring certain non-Oracle products, for example, IBM WebSphere Application Server, Microsoft SQL Server, Juniper Networks NetScreen Firewall, and
so on.

With a broad set of end-to-end monitoring, administration, configuration management, provisioning, and security capabilities, Grid Control reduces the cost and complexity of managing such grid computing environments. Robust service-level management functionality within Grid Control dramatically improves service levels through rich transaction and end-user performance monitoring and deep diagnostics for multi-tier Internet applications.


Grid Control Architecture

Although Grid Control is viewed as a single entity, technically, it is built with the following software components:

■ Oracle Management Service (OMS)
■ Oracle Management Agent (Management Agent)
■ Oracle Management Repository (Management Repository)

While OMS acts as the brain of the Grid Control architecture responsible for communicating with Management Agents and a central repository that stores information, Management Agent acts as the hands and legs of a body responsible for collecting information from the monitored targets and transporting them to OMS. And, Management Repository is the repository configured in Oracle Database to store the collected information. The following illustrates the Grid Control architecture:


Components of Grid

1. Oracle Management Service (OMS)
OMS is a J2EE Web application that orchestrates with Management Agents to discover targets, monitor and manage them, and store the collected information in a repository for future reference and analysis.OMS also renders the user interface for the Grid Control console.

2. Oracle Management Repository (OMR)
Technically, OMS uploads the monitoring data it receives from the Management Agents to the Management Repository. The Management Repository then organizes the data so that it can be retrieved by OMS and displayed in the Grid Control console.

3. Oracle Management Agent (OMA)
Oracle Management Agent (Management Agent) is one of the integral components of Enterprise Manager Grid Control (Grid Control) architecture. Management Agent communicates with the monitored targets, collects information about their health, transports that information to Oracle Management Service (OMS), which in turn stores the collected details in the central repository created in Oracle Database.

4. Grid Control Console
Grid Control Console is the user interface you see after you install Grid Control. From the Grid Control console, you can monitor and administer your entire computing environment from one location on the network. All the services within your enterprise, including hosts, databases, listeners, application servers, and so on, are easily managed from one central location.


Users related to Grid Control

  1. SYSMAN
The SYSMAN account is the default super user account used to set up and administer Enterprise Manager Grid Control. It is also the database account that owns the objects stored in the Oracle Management Repository. The SYSMAN account is created automatically in the Management Repository database during the Enterprise Manager installation. You also provide a password for the SYSMAN account during the installation.

      2. DBSNMP

The DBSNMP user is used by EM Agents to login and monitor the target database. EM agent uses this account to access performance stats about the database. The DBSNMP credentials sometimes referred to as the monitoring credentials.


Installation of Grid Control

Hardware Requirements


Software Requirements

Since we will install Grid control software on windows XP machine hence you need to download the Grid control software from the Website of ORACLE Corporation using following link:
http://www.oracle.com/technetwork/oem/grid-control/downloads/winsoft10g-100825.html

User and Operating System Group Requirement
• Ensure that the target host where you want to install the Grid control has the appropriate users and operating system groups created. The group and the users that are created to install oracle database software are enough to proceed. Since we are going to install grid control on windows server hence this step is not required.
• This section introduces you to the first installation type offered by OUI, that is, Enterprise Manager 10g Grid Control Using a New Database.

Installation Sequence

 Oracle Database 10g Release 2

In the specified installation directory, the installer creates a subdirectory for Oracle Database and places the software binaries in it. This Oracle Database contains an embedded Management Repository.For example, if the installation directory is /$ORACLE_HOME/OracleHome, then thesubdirectory created for the database is:
/$ORACLE_HOME/OracleHome/db10g

Oracle Management Service 10g Release 2

Technically, the installer installs an application server, that is, Oracle Application Server 10g Release 2 (10.1.2.0.2) where the OMS is deployed. In the specified installation directory, the installer creates a subdirectory for OMS and places the software binaries in it.For example, if the installation directory is /$ORACLE_HOME/OracleHome, then the subdirectory created for OMS is:

/$ORACLE_HOME/OracleHome/oms10g

Oracle Management Agent 10g Release 2
In the specified installation directory, the installer creates a subdirectory for the Management Agent and places the software binaries in it. The subdirectory is agent10g.For example, if the installation directory is /$ORACLE_HOME/OracleHome, then the subdirectory created for the Management Agent is:

$ORACLE_HOME/OracleHome/agent10g

Configuration All
The installer runs the Configuration Assistants tools to configure all the installed components:
                                   

                                                INSTALLATION


1. Specify installation type

To install Enterprise Manager Grid Control using a new database, follow these steps:
Select the first option (Enterprise Manager 10g Grid Control Using a New
Database). By default, this option is selected when you invoke the installer.


2. Specify installation location


Click Next. In the Specify Installation Location screen that appears, specify a parent directory (base directory), for example, /scratch/OracleHomes (on Linux), for the new installation. All the Oracle homes created during this installation are created as subdirectories under this parent directory. For example: db10g, oms10g, and agent10g.


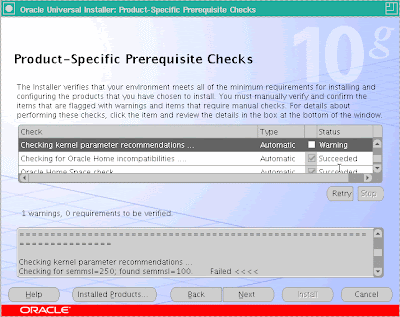
3. Prerequisite checks

At this point, the installer runs some prerequisite checks to verify if the environment meets the minimum requirements for a successful Grid Control installation. Early detection of system environment problems such as insufficient disk space, missing patches, inappropriate hardware, and so on results in a smoother installation later.

This screen displays the name, type, and status for all prerequisite checks designed for the installation. Automatic checks are run first, followed by optional and manual checks.


4. Specify Configuration

Specify the new Database Name and the Database File Location (location where the new database is going to reside).


5. Specify optional configuration

Leave this window as it is.


6. Specify security options

You must specify the passwords that are used to secure your entire Grid Control environment. This screen has two sections - Management Service Security, and Repository Database Passwords.

• Management Server Security: The password that you specify here is used to secure and lock the OMS.

Select Require Secure Communications for all agents if you want the secure OMS to communicate only with secure Management Agents.

For example, consider you have unsecured 10.1.n agents in the Grid and you have secured the OMS. Now, if you select the Require Secure Communications option, then all communication between the 10.2 OMS and 10.1.n agents fails (because these agents have not been secured).

• Repository Database Passwords: Specify the passwords for each of the administrative database accounts.

To specify a different password for each account, select Use different passwords for these accounts and specify the passwords for each account. To specify the same password for all accounts, select Use the same password for all accounts and specify one password to be used for all database accounts.


7. Summary

This screen provides a summary of the options that you have selected during the installation process. Depending on the installation type, it also provides any or all of the following details:

• Global Settings
• Product Languages
• Space Requirements
• Installed Products

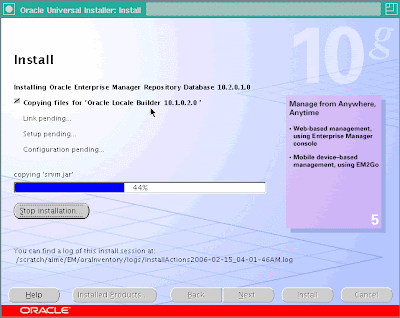
Click Install to start the installation. The Install screen that appears displays the installation progress bar.


8. Installation in Progress

The installer seamlessly installs all Grid Control components based on the installation type you selected.


9. Configuration assistants

The Configuration Assistants screen appears. At this point, the installer starts running the configuration assistants.
This screen displays the name, status, and the type of each configuration tool that Oracle recommends to be run before completing the installation.

 Grid Control Configuration Tools:

Oracle Repository Database 
• Oracle Net Configuration Assistant
• Oracle Database Configuration Assistant
• OC4J Configuration Assistant

Oracle Enterprise Manager Grid Console 
• OC4J Configuration Assistant
• HTTP Server Configuration Assistant
• Java Configuration Assistant
• Web Cache Configuration Assistant
• OracleAS Instance Configuration Assistant
• Register DCM Plug-ins with Enterprise Manager
• DCM Repository Backups Assistant
• Enterprise Manager Technology Stack Upgrade
• Oracle Management Service Configuration

Oracle Management Agent 
• Agent Configuration Assistant